Tapo smart home integration, free and open source

Your Tapo cameras, doorbells, plugs, bulbs and hub sensors in Gladys.
Published by William-De71
- Devices
- Version 2.1.0
- Requires Gladys >=5.1.0
- ★ 0
This integration adds your TP-Link Tapo devices to Gladys: cameras and doorbells (image on the dashboard, doorbell presses and motion as scene triggers, battery level), but also plugs, power strips, bulbs, switches and the sensors of the H100 hub — see Plugs, bulbs, switches and sensors.
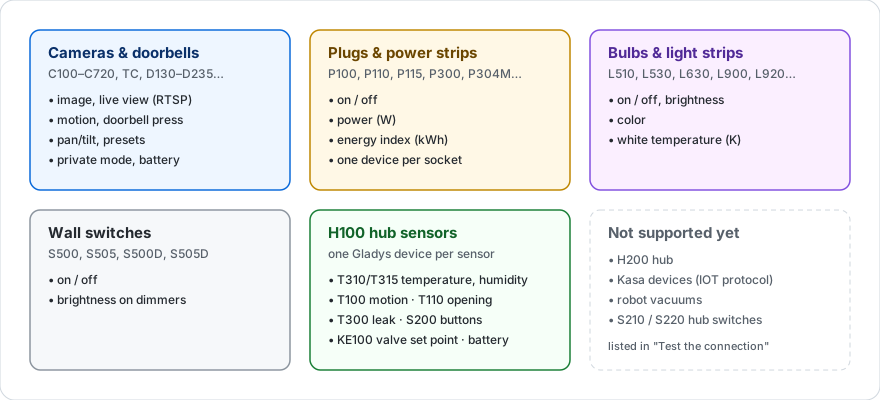
How it works
Two channels, each doing what it is good at:
- The TP-Link cloud is used to find the list of your cameras. It is the same account as in the Tapo app. It does not, however, report the local address of the cameras.
- A scan of your network then locates each camera, exactly like the Tapo app does on startup. In most setups this saves you from typing any IP address (see Your cameras' IP address when it does not).
- Your local network delivers everything else: images, doorbell, motion, battery. None of it travels through the cloud: Gladys talks to the camera directly, at your home.
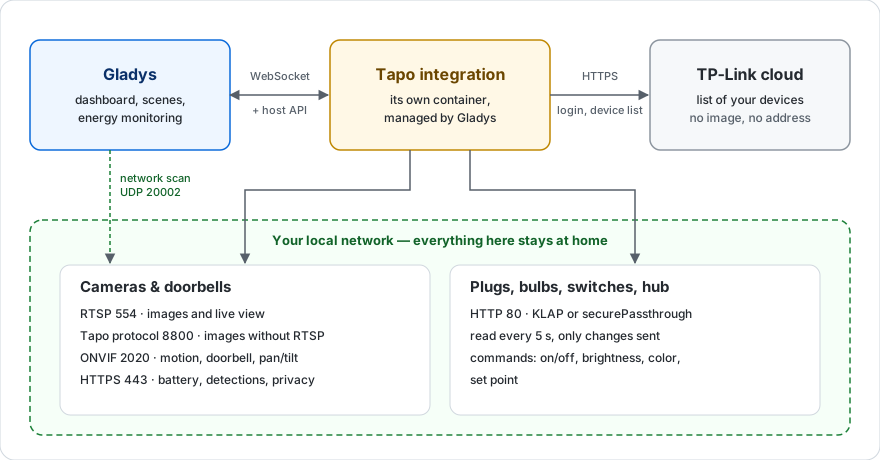
To capture an image, the integration automatically picks one of two modes, depending on what the camera accepts:
| Mode | When it is used | What it requires |
|---|---|---|
| RTSP | The camera exposes an RTSP stream (port 554) | A camera account created in the Tapo app |
| Proprietary | The camera exposes no RTSP stream (port 8800) | Nothing beyond your Tapo account |
The second mode is TP-Link's internal protocol, the one the mobile app uses. It makes it possible to get an image out of the models — often battery-powered — that offer no standard stream.
Setup
The integration requires Gladys 5.1.0 or later, because of its scene trigger. An older Gladys does not receive its updates and stays on version 2.0.0 until Gladys itself is updated.
1. Enter your Tapo account
In the Configuration screen of the integration, enter the email and password of your TP-Link / Tapo account, then pick the closest cloud region (Europe by default).
2. Create a camera account (recommended)
If your cameras are wired (C100, C200, C210, C500…), RTSP is the better mode: lighter and more robust. It requires a camera account created in the Tapo app:
- Open the Tapo app and select your camera.
- Go to Camera settings → Advanced settings → Camera account.
- Set a username and a password.
- Copy them into the Camera account (RTSP and ONVIF) section of the Gladys configuration.
Beware: this camera account is not your Tapo account, and it is created per camera. Two ways to fill it in:
- if you used the same credentials on every camera, simply fill the Default account username / password fields;
- otherwise, once the cameras are added (step 3), use the Save a camera account action at the bottom of the Configuration screen: pick the camera in the list, type the username and the password, run it. Gladys tries a capture right away and tells you whether the account works. Repeat for each camera.
Per-camera accounts take precedence over the default one, and stay attached to the camera even if you rename it. If you leave everything empty, the integration will use the proprietary mode for every camera.
The Accounts per camera (advanced) field still accepts a typed list (name|username|password, comma-separated), but the action is simpler and accepts any password, commas included.
On some models you also need to enable Third-Party Compatibility (in the Tapo app, under Me → Tapo Lab) before the RTSP stream becomes reachable.
3. Run a scan
Click Test the connection: Gladys logs in to the cloud, scans your network and prints one line per camera — its address, where that address came from, and how the image will be captured:
Connected to the Tapo cloud: 3 device(s), 2 reachable on your network.
✔ Living room (C230): 192.168.1.20 (found on the network), images over RTSP
✔ Garage (C210): 192.168.1.21 (found on the network), images over RTSP
✖ Garden (C660): not found on your network → run "Set a device IP address" below.
Then go to the Discover screen and run a scan. Your cameras show up there, ready to be added. Once created, add the Camera widget to your dashboard.
If a camera is marked ✖, read on.
Your cameras' IP address
To get the images, Gladys needs the local IP address of each camera (for example 192.168.1.42). The TP-Link cloud does not provide it: the integration finds it by scanning your network, and recognizes each camera by its MAC address.
When the scan does not find a camera
That happens when the camera is on another subnet or VLAN than Gladys, or when your router filters broadcast traffic. The fix:
- In the Tapo app, open the camera, then Settings (gear icon) → Device info: the IP address is shown there.
- In Gladys, on the integration's Configuration screen, scroll down to the Set a device IP address action.
- Pick the camera in the list, type its address, run it.
Gladys checks right away that something answers at that address, captures an image and tells you whether everything works. The address is attached to the camera itself: it stays valid if you rename the camera, in Gladys or in the Tapo app.
To go back to automatic detection, run the action again with an empty address.
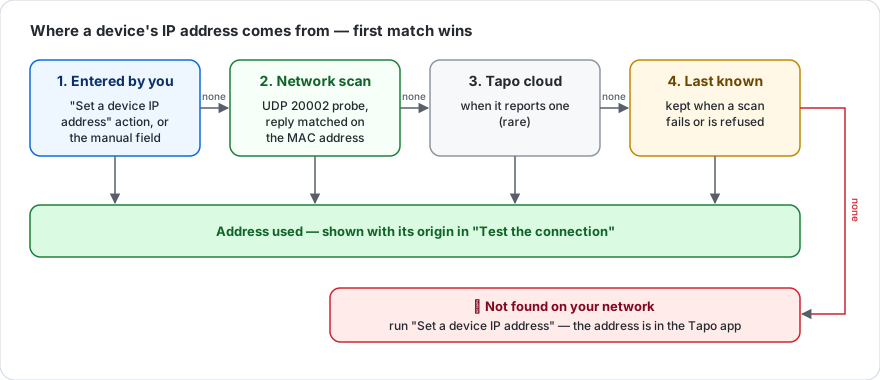
Tip — reserve each camera's address in your router ("DHCP reservation" or "static lease"). Otherwise the router may hand it another one after an outage, and a typed address would become wrong.
What about the cloud, without an IP address?
Not possible. TP-Link offers third-party applications no way to fetch a camera's image or stream over the Internet: the Tapo app goes through relay servers reserved for its own use. Every existing integration — Home Assistant's included — therefore works over the local network, which is also what guarantees your images never leave your home.
The "Manual addresses (advanced)" field
It is still there for typing addresses by hand: comma-separated entries, each as name|ip (or name=ip), for example Garden camera|192.168.1.42, Living room|192.168.1.43. The name is matched without regard to case, accents, spaces or underscores, and may also be the camera's MAC address. The action above remains safer: no name to copy, and the address is checked.
What battery cameras do — and do not do
Battery and solar models (C610, C425, D230…) expose neither RTSP nor ONVIF: they only speak TP-Link's proprietary protocol. That has two practical consequences.
No live video
These cameras show regularly refreshed images, not a continuous stream. Gladys' live view relies on a URL handed to ffmpeg, and a proprietary session is encrypted and driven by the integration itself — it cannot be expressed as a URL. Wired RTSP cameras do get live video.
This is a limit of the protocol rather than of the integration: no tool does better on these models, short of going through an external relay such as go2rtc.
The battery is protected automatically
Capturing an image is by far the most demanding thing asked of a camera. On a solar model, capturing too often drains the battery faster than the panel refills it — and a lithium cell taken too low may stop accepting charge altogether, which cannot be fixed remotely.
So the integration backs off on its own:
| Battery | Automatic refresh | Widget, scene, doorbell |
|---|---|---|
| above 60% | yes | yes |
| between 40% and 60% | paused | yes |
| below 40% | paused | no |
A camera that went below the first threshold only resumes at 80%, deliberately well above the pause threshold: resuming just over it would restart the drain immediately, and repeated shallow cycles wear the battery faster than one proper cycle. Avoid setting that level to 100%: a solar camera charges in bursts and rarely reads exactly full, which would leave it paused for good.
The battery level and the events keep being read in every case: they cost almost nothing, and they are what tells when the camera has recharged.
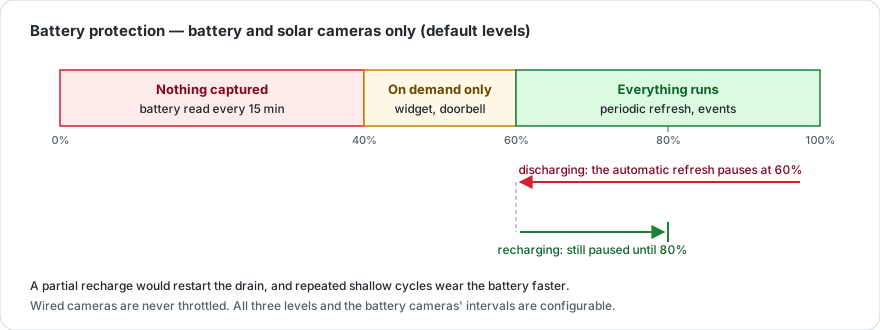
A battery camera that stops answering — deep sleep, refused session, network down — is also brought back to on-demand: its last known level can no longer be trusted, and a silent camera is more likely to be empty than fine.
A capture interval of their own
Battery cameras have their own refresh interval, independent of the wired ones. Spacing out the captures of a solar model therefore costs nothing to the freshness of your mains-powered cameras.
| Setting | Default | Applies to |
|---|---|---|
| Image refresh interval | 60s | wired cameras only |
| Battery camera refresh interval | 900s (15 min) | battery/solar models |
This is the single most effective setting: what costs the battery is waking the camera up, far more than the image itself. In winter, or if your panel gets little sun, lengthen that interval and raise the pause threshold.
Features created
Each camera becomes one device in Gladys:
- Image — the picture shown by the camera widget, refreshed on demand. This feature carries the name of the camera.
- Doorbell — a press on the button, usable as a scene trigger.
- Motion — motion detection, also usable as a trigger.
- Enabled — private mode: see Private mode.
- Capture — a button to ask for an image right away (battery models, refreshed less often).
- Move and Preset — on motorized cameras: see PTZ.
- Battery — the remaining level, as a percentage (battery models).
The integration names these features in English (for example Garage - Motion), whatever the language of Gladys; you can rename each one. To start a scene on what a camera sees — a person, a vehicle, a pet — use the trigger described in Scenes.
When someone rings, the integration immediately captures an image and pushes it to Gladys: the widget already shows the visitor by the time you open the notification.
How events reach Gladys
Two possible paths, chosen automatically per camera:
| Path | How it works | Delay |
|---|---|---|
| ONVIF | The camera tells Gladys the moment it detects something | near instant |
| Polling | Gladys regularly asks the camera what it detected | up to one interval |
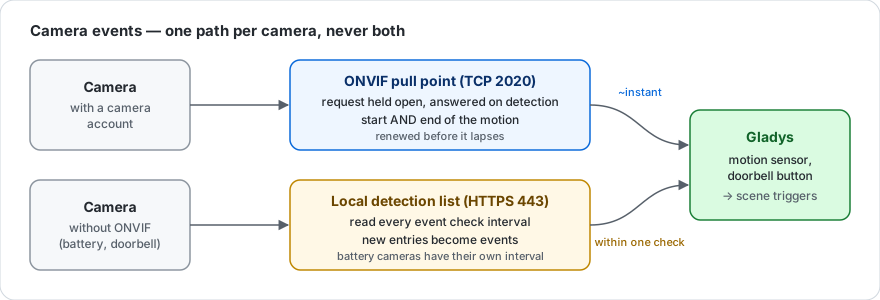
ONVIF is clearly preferable for triggering a scene: a motion arrives within a second instead of waiting for the next check. All it needs is the camera account to be filled in — those are the credentials ONVIF uses, not your Tapo account.
It is also the only path that reports the end of a motion: the sensor goes back down when the camera says so, rather than after a fixed delay.
Wired cameras (C210, C200, C500…) generally offer ONVIF, which gives them a motion sensor they did not have before. Battery models do not offer it and stay on polling: that is not a problem, their detections still come through, just with a slight delay.
There is nothing to configure: if the camera account is filled in and the camera accepts ONVIF, the integration uses it; otherwise it polls the camera as before.
Private mode
Every camera gets an Enabled control — Gladys' standard private mode for cameras. Turn it off and Gladys stops capturing, displaying and storing that camera's image, everywhere: dashboard, chat, scenes. It is usable in a scene — "when we get home, turn the living room camera off".
On Tapo cameras that have a privacy mode (the lens is physically covered), the control drives it as well: turning the camera off covers the lens, turning it back on uncovers it. That goes through the same local channel as the battery level: no camera account needed, and battery models get it too. It works both ways — a privacy mode toggled from the Tapo app shows up in Gladys at the next check, within the minute.
On a camera without a privacy mode, the control only acts on Gladys' side: the camera keeps running, Gladys just leaves it alone.
While a camera is off, a battery camera is not woken up for nothing, and the widget shows that the camera is disabled rather than an old image.
Coming from version 1.2 or earlier — the privacy mode used to be a separate switch. It keeps working on your existing cameras, so your scenes are not broken. When you update a camera from the Discover screen, the switch is replaced by the Enabled control: re-point the scenes that used the switch (beware, the values are reversed — the switch was "on" when the lens was covered, the control is "on" when the camera is active).
Pointing a motorized camera (PTZ)
Motorized cameras (C200, C210, C225, C500…) can be aimed from Gladys: the arrows appear directly on the dashboard camera widget, next to the image.
Like the events, this goes through ONVIF and therefore needs the camera account to be filled in. The integration asks each camera what it can do: a camera that pans without a motorized zoom only shows the four arrows, and a fixed camera shows nothing at all. There are no capabilities for you to declare.
The saved positions you created in the Tapo app are picked up as they are, with their names. They appear in a dropdown below the arrows, and can be used in a scene — the most common use by far: "when I leave, point the camera at the door". Gladys neither creates nor renames positions: that stays in the Tapo app. If you add one, it shows up at the next scan.
Pressing an arrow moves the camera one step, not continuously. This is deliberate: a command sent from a scene, or a press whose release is lost, must stay a small movement rather than several seconds of rotation. Each step therefore ends on its own: even if Gladys loses contact with the camera right after, no movement is left running.
One note on speed: Tapo firmwares largely ignore the requested speed and derive the pace from the distance to travel. A step may therefore feel slow — that is the camera's behaviour, not a missing setting.
Scenes
A camera or a doorbell can start a scene with the Tapo camera detection trigger. It tells what the camera saw, and one scene can watch several cameras. The Motion and Doorbell features of each camera remain usable with the standard Device state change trigger.
The Tapo camera detection trigger
| Field | What to choose |
|---|---|
| Camera | the camera or doorbell to watch; leave it empty for every camera |
| Detected | Person, Vehicle, Pet, Motion or Doorbell press; leave it empty for every kind |
The scene receives three variables, which you can insert in a message: Camera identifier, Camera name and Detected (person, vehicle, pet, motion or doorbell).
- Person, Vehicle and Pet need a camera with smart detection, enabled in the Tapo app. The camera then says what it saw; without it, every detection arrives as Motion. The integration never guesses from the image.
- Each camera and each kind starts the scene at most once a minute: someone walking around the garden for three minutes starts it once a minute at most, not at every notification of the camera.
- When a person, a vehicle or a pet is recognized, the plain motion that comes with it starts nothing more: a scene on Motion only runs for what the camera did not identify. Leave Detected empty to react once to anything.
- A camera using ONVIF (camera account filled in) reports within a second. Otherwise the detection arrives at the next Event check interval and, for a battery camera, at the next Battery camera check interval (5 minutes by default). Doorbells are always checked at the event interval.
- Only the cameras added to Gladys start the trigger.
Examples
Light the garden when someone is there at night. Trigger Tapo camera detection: camera "Garden", detected Person. Condition Time condition: after 22:00 and before 06:00. Actions Turn On the Lights (the garden lights), Wait 5 minutes, then Turn Off the Lights. The neighbour's cat crossing the lawn turns nothing on.
Get the doorbell picture on your phone. Trigger Tapo camera detection: detected Doorbell press, camera left empty. Action Send a camera image with the doorbell. The integration captures an image the moment the button is pressed, so the picture shows who rang. With several doorbells, add Send Message "Someone rang at Camera name", inserting the variable Camera name.
Ignore the pets. Build the scene on Person (and another one on Vehicle if needed) rather than leaving Detected empty: a dog or a cat wandering in front of the camera then starts nothing.
A car in the driveway. Trigger Tapo camera detection: camera "Driveway", detected Vehicle. Action Send Message "A vehicle has just arrived".
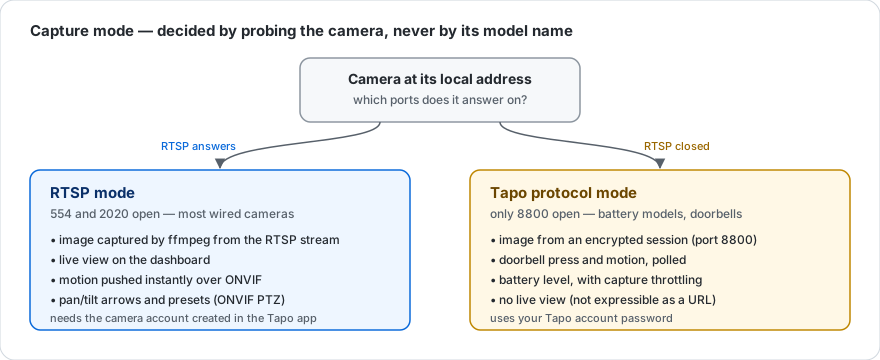
Plugs, bulbs, switches and sensors
Beyond cameras, the integration supports the other Tapo devices of your account. They show up on the Discover screen like the cameras, and use your Tapo account: no extra account to create.
| Device | Examples | In Gladys |
|---|---|---|
| Plug | P100, P105, P115 | On/off |
| Metering plug | P110, P110M, P115 | On/off, power (W), energy (kWh) |
| Power strip | P300, P304M, P306 | One device per socket, each switched on its own |
| Bulb, light strip | L510, L530, L630, L900, L920, L930 | On/off, brightness, color and white (depending on the model) |
| Wall switch | S500, S505 / S500D, S505D | On/off / dimmer (brightness) |
| H100 hub sensors | T310, T315 | Temperature, humidity |
| T100 | Motion | |
| T110 | Opening (door, window) | |
| T300 | Water leak | |
| S200B, S200D | Button: single click, double click | |
| KE100 | Temperature and set point of the radiator valve |
Each hub sensor becomes a device of its own, with a low-battery alert (and the battery level when the sensor reports it). Capabilities are asked of the device, never guessed from the model: a bulb gets a color control only if it can do color.
How it works
These devices do not notify Gladys on their own: the integration reads them regularly, at the Plugs, lights and sensors check interval option (5 seconds by default). A button press or a door opening therefore reaches Gladys at the next read. One read per physical device is enough: a hub with ten sensors costs a single request. Only values that change are sent to Gladys.
The exchange is local, with the protocol the Tapo app uses (KLAP on recent firmwares, the older encryption on the others — picked automatically). The IP address comes from the network scan, as for the cameras; otherwise use the Set a device IP address action (for a sensor, it is its hub's address that matters).
Energy of metering plugs
The plugs report today's consumption, reset every night. The integration turns it into a counter that only goes up (kWh), which is what Gladys' energy monitoring expects. One limit: what is consumed while the integration is stopped is not counted.
Not supported yet
- the H200 hub (it speaks the cameras' protocol);
- the older Kasa devices ("IOT" protocol) and robot vacuums;
- the S210 / S220 wireless switches paired to a hub.
They are named in Test the connection and in the logs, rather than silently ignored.
Options
- Image quality — HD gives a sharper image, SD is lighter and faster to capture.
- Manual addresses (advanced) — see Your cameras' IP address; the Set a device IP address action is simpler.
- Plugs, lights and sensors check interval — how often those devices are read (5 s by default); see How it works.
- Event check interval — how often the integration looks for a ring or a motion. Shorter reacts faster but talks to your cameras more often. This setting only affects cameras without ONVIF: those that use it tell Gladys on their own, with nothing to wait for.
- Capture timeout — how long a camera is given to deliver an image.
The Refresh the images action forces a new capture of every camera, handy to verify your setup.
Troubleshooting
"Connection refused" — check the email and password of your Tapo account. Two-step verification on your TP-Link account prevents this login.
The widget stays empty, the logs show TAPO_CAMERA_IP_UNKNOWN — Gladys does not know the camera's address: the scan did not find it. Run Test the connection to see which cameras are affected, then follow When the scan does not find a camera.
A camera has an address but does not answer — Test the connection flags it with a ⚠ and says where the address came from. Check that the camera is powered on, on the same network as Gladys, and that Third-Party Compatibility is enabled in the Tapo app. If the address changed (no DHCP reservation), fix it with the Set a device IP address action.
The widget shows an error even though the camera answers — if the camera uses RTSP, make sure its camera account is filled in. This is by far the most common cause: the logs then show TAPO_RTSP_ACCOUNT_MISSING. Remember that this account is specific to each camera.
No image from a battery doorbell — these models go into deep sleep to save their battery and can take several seconds to answer. Raise the capture timeout if needed.
Motion takes a while to come through — the camera is most likely on the polling path. Check that its camera account is filled in: that is what lets ONVIF work, and therefore what makes motion instant. Battery models do not offer ONVIF at all.
No motion detected on an ONVIF camera — in the Tapo app, check that motion detection is enabled and privacy mode is off: a camera in privacy mode reports nothing at all.
The detection scene never starts for a person — the camera reports Motion only: enable smart detection (person, vehicle, pet) in the Tapo app, if the model has it. Check also that the camera is added to Gladys and that the Camera field of the trigger points to it.
The scene does not start at every movement — that is deliberate: each camera starts it at most once a minute per kind, and the plain motion that comes with a recognized person, vehicle or pet starts nothing more.
Cameras without an RTSP stream — battery models and doorbells (C610, C425, D230…) expose neither RTSP nor ONVIF. That is not a blocker: the integration automatically falls back to the TP-Link proprietary protocol, the one the Tapo app uses, and captures their images without any camera account. The only difference: no live video for those cameras, just regularly refreshed images.
They sometimes wake up slowly: if a capture fails with a timeout message, raise the capture timeout.
Privacy
Your Tapo credentials are stored by Gladys and are only used to reach the TP-Link cloud and your cameras. Images are captured on your local network and sent straight to your Gladys: they never go through any third-party server.
Configuration settings
These are the settings Tapo asks for in its configuration screen in Gladys.
| Setting | Type | Required | Description |
|---|---|---|---|
| Getting started | section | No | This integration finds your devices through your TP-Link cloud account, then talks to them on your local network. Enter your Tapo account below, then go to the Discover screen and run a scan: your devices appear there, ready to be added. Gladys locates each device on your network by itself. If one is reported as not found (another subnet or VLAN, broadcast filtered by your router), use the "Set a device IP address" action at the bottom of this page: pick the device, type its address — it is shown in the Tapo app, under the device settings > Device info. |
| Tapo account email | string | Yes | The email address of your TP-Link / Tapo account, the one you use in the Tapo app. |
| Tapo account password | secret | Yes | The password of your TP-Link / Tapo account. It is used to list your devices, to talk to your plugs, lights and hubs on your network, and, for cameras without RTSP, to open the local stream. |
| Cloud region | select | No | The TP-Link cloud server closest to you. Change it only if the connection test fails. |
| Camera account (RTSP and ONVIF) | section | No | Cameras that expose an RTSP stream need the camera account you created in the Tapo app (Camera settings > Advanced settings > Camera account). It is also what unlocks ONVIF, which lets a camera report a motion the instant it happens instead of being polled. This is NOT your Tapo account, and it is created PER CAMERA. The simplest way to enter it: use the "Save a camera account" action at the bottom of this page, once per camera. The two fields below only serve as a default, for users who reused the same credentials everywhere. |
| Default account username | string | No | Used for every RTSP camera that has no specific account below. |
| Default account password | secret | No | Used for every RTSP camera that has no specific account below. |
| Accounts per camera (advanced) | secret | No | Prefer the "Save a camera account" action below: the accounts it saves are stored separately and do not appear here. Format, if you type here: cameras separated by a comma, each as name|username|password (a password containing a comma must go through the action). |
| Image quality | select | No | HD gives a sharper image, SD is lighter and faster to capture. |
| Advanced | section | No | Only needed in particular cases: the integration finds your devices and their addresses by itself. |
| Manual addresses (advanced) | string | No | Prefer the "Set a device IP address" action at the bottom of the page: you pick the device in a list, and Gladys checks the address answers. If you type here instead: entries separated by commas, each as name|ip (or name=ip). The name is matched without regard to case, accents, spaces or underscores, and may also be the device's MAC address. |
| Event check interval (s) | number | No | How often the integration checks for a doorbell press or a motion detection. A shorter interval reacts faster but talks to your cameras more often. Only affects cameras without ONVIF: cameras that support it push their events instantly, with nothing to wait for. |
| Plugs, lights and sensors check interval (seconds) | number | No | How often the plugs, lights and the sensors of a hub are read. These devices push nothing: a button press or a door opening reaches Gladys at the next read. Each read is one short request per device on your network. |
| Capture timeout (s) | number | No | How long a camera is given to deliver an image. Cameras using the proprietary protocol — battery models waking from deep sleep — need more time than an RTSP one. Above 14s the dashboard live view may time out first, but the scheduled refresh still succeeds. |
| Image refresh interval (s) | number | No | How often a new image is captured for the dashboard, on MAINS-POWERED cameras only. Battery and solar cameras have their own setting below, so keeping your wired images fresh costs nothing to the others. |
| Battery protection | section | No | Capturing images is what drains a battery or solar camera. These settings apply ONLY to battery and solar models — wired cameras keep their own interval and are never throttled. Once a camera goes below the pause limit, capturing only resumes at the recharge level: a partial recharge would restart the drain, and repeated shallow cycles wear the battery faster. |
| Battery camera refresh interval (s) | number | No | How often a battery or solar camera is captured, independently of your wired cameras. Waking a camera up is what costs the battery, so this is the single most effective setting: 900s (15 min) lets a solar panel refill between two captures. Lower it only if your cameras recharge faster than they discharge. |
| Battery camera check interval (s) | number | No | How often a battery or solar camera is contacted to read its level and its detections, independently of your wired cameras. Waking the camera is what costs the battery, and this happens far more often than a capture: at the wired 20s a camera is woken 180 times an hour, which drains a solar model faster than the panel refills it. Raise it if your camera keeps losing charge overnight. |
| Pause automatic capture below (%) | number | No | Below this level the automatic refresh stops. Opening the camera widget or a doorbell press still captures an image. This level is also the ceiling of the one below: a "stop every capture" set higher is lowered to it, so that the on-demand band does not vanish. |
| Stop every capture below (%) | number | No | Below this level no image is captured at all, not even on request. Motion detection stops here too, and so does the privacy mode: the camera is only woken every 15 minutes for its battery level, which is what tells when it has recharged. Capture resumes a few points above this level, so a camera sitting right on it does not flip back and forth. |
| Resume automatic capture at (%) | number | No | Once a camera has been paused, it stays paused until it reaches this level — deliberately well above the pause limit, so it does not immediately fall back into the drain it was pulled out of. Avoid 100%: a solar camera charges in bursts and rarely reads exactly full, which would keep it paused for good. |
How to install Tapo in Gladys
- In Gladys, open Integrations: Tapo appears in the catalog, next to the native integrations, with a community badge.
- Click Install. Gladys pulls the Docker image (
ghcr.io/william-de71/gladys-tapo:2.1.0), starts it in a sandbox isolated from the core, and generates the integration's interface (devices, discovery and configuration). - Open the Configuration screen of the integration, fill in the settings, and save.
- You can also install it directly from its repository URL: https://github.com/William-De71/gladys-tapo.
Tapo requires Gladys >=5.1.0. The catalog inside Gladys refreshes every hour, so a new version becomes available at most one hour after its release.
Not running Gladys yet? It is free and open source: follow the installation guide to get started.
About external integrations
Tapo is an external integration: a community integration packaged as a Docker container and published on GitHub, that Gladys installs in one click and runs in a sandbox isolated from its core. It is published and maintained by William-De71, not by the Gladys core team.
- Browse all integrations, native and community
- Build and publish your own external integration
- Source code on GitHub — source of this documentation