Spotify smart home integration, free and open source
Control your Spotify Connect devices, launch playlists and follow playback on the dashboard.
Published by William-De71
- Devices
- Version 1.5.1
- Requires Gladys >=5.1.0
- ★ 0
This integration lets you control your Spotify Connect devices from Gladys Assistant: play, pause, previous / next track, volume, and launch one of your playlists, a recently played track, or one of your favorites.
Features
- Spotify Connect devices: every speaker, phone or computer connected to your Spotify account appears as a Gladys device.
- Playback control: play, pause, previous, next.
- Volume: set the volume of the active device.
- Playback state: Gladys reflects in real time whether a device is playing or paused.
- "Spotify" device: a separate, single device carries three lists — playlists, recent tracks, favorites. Picking an option there does not play anything: it is only remembered as a pending selection, and the play button of any Spotify Connect device launches it as soon as it is pressed.
- Dashboard widgets: now playing with cover and controls, quick play of your favorite playlists/albums, recently played tracks.
- Scenes: start a scene when playback starts, stops or the track changes, and play, pause or read what is playing from a scene.
- Actions: test the connection, finish a connection by hand, refresh the playlists/recent tracks/favorites, and disconnect, directly from the configuration screen. To reauthorize, simply click "Connect with Spotify" again.
Requirements
- A Spotify Premium account (required: the Spotify API does not allow controlling playback with a free account).
- A Spotify application created on the developer dashboard (free), to get a Client ID and a Client Secret.
- Gladys Assistant 5.1.0 or later (dashboard widgets).
Create your Spotify application
- Go to the Spotify Developer Dashboard and sign in.
- Click Create app.
- Give it a name and a description (for example "Gladys").
- In Redirect URIs, enter
https://my.gladysassistant.com/redirect/oauth(see "The redirect address" below), then click Add. - Tick the Web API, then save (Save).
- Open the app Settings: copy the Client ID, and reveal and copy the Client Secret.
The redirect address (Redirect URI)
Spotify only agrees to send you back to Gladys if the redirect address is declared beforehand in your application, and it must be identical character for character to the one Gladys uses.
Since April 2025, Spotify also requires that address to be HTTPS (or on the 127.0.0.1 loopback address). An address such as http://192.168.1.50:1444/... is therefore always rejected — which covers most self-hosted installations.
Gladys solves this with an HTTPS redirect page shared by every instance. The address to declare in Spotify is therefore fixed, and the same for everyone:
https://my.gladysassistant.com/redirect/oauth
Copy it as is into the Redirect URIs field of your Spotify application, then Add and Save. The integration configuration screen also displays it, with a copy button.
ℹ️ This address depends neither on your port, nor on your IP address, nor on the integration
selector: the same value works whether you reach Gladys locally or through Gladys Plus. You no longer have to update it when your installation changes.
How it works
After you authorize, Spotify sends your browser back to that HTTPS page. The page reads your Gladys address — carried in the state parameter, the only one an OAuth provider hands back untouched — and bounces you to your instance, whatever it is, including over plain HTTP on your local network.
This is the same approach as my.home-assistant.io for Home Assistant.
On privacy, to be precise: the page is static, nothing runs server-side and nothing is stored. The authorization code does however appear in the address requested on a Gladys-operated domain; that code alone is useless, since exchanging it for tokens requires your Client Secret, which never leaves your installation. Tokens themselves transit neither through the redirect page nor through the Gladys frontend.
ℹ️ If you already reach Gladys over HTTPS, the configuration screen offers an advanced option to use your own instance address instead of the redirect page. You then have to declare that address in Spotify.
Connection
- Open the Spotify integration configuration screen in Gladys.
- Paste your Client ID and Client Secret, then save.
- Click "Connect with Spotify": you are redirected to Spotify to authorize Gladys.
- After authorizing, you go through the redirect page, which sends you back to your Gladys automatically.
- The connection is established and your Spotify Connect devices become available for discovery.
This works whichever way you reach Gladys: locally by its IP address, from the machine itself, or through Gladys Plus.
Access tokens are stored and refreshed automatically. Since July 2026, however, Spotify limits each authorization to 6 months: after that, Gladys reports that Spotify revoked the access, and you just click "Connect with Spotify" again (your devices and scenes are kept). The automatic refresh does not extend this period; only a new connection resets it.
If the automatic return fails
This should no longer happen, but the integration keeps a fallback method — for instance if the redirect page is unreachable, or on a Gladys version older than the one that introduced it.
If, on the way back from Spotify, your browser shows an error page ("this site can't be reached", "connection refused"…) instead of returning to Gladys: the authorization did go through, and the connection code is in the address shown.
-
In the address bar of the error page, select and copy the full address. It looks like:
http://192.168.1.50:1444/dashboard/integration/device/external/ext-spotify/oauth-callback?code=AQD...&state=8f2c... -
Go back to Gladys, to the Spotify integration configuration screen.
-
Paste that address into the Returned address field (section "Browser could not return to Gladys?"), then save.
-
Click the "Finish the connection" button.
-
The confirmation message appears: the connection is established and your devices become available for discovery. The field clears itself, since the code is single-use.
⚠️ The code in that address is single-use and expires after a few minutes. If it fails, simply click "Connect with Spotify" again and retry with the new address.
Device discovery
Only devices currently online (Spotify app open, speaker awake and connected) are returned by the Spotify API. If a device does not appear, open Spotify on it and run discovery again.
Each Spotify Connect device shows a Cloud badge while Spotify runs on it, and Unreachable once it is offline (checked every minute): a command sent to it then fails until Spotify is opened on it again.
The "Spotify" device: playlists, recent tracks and favorites
In addition to your Spotify Connect devices, the integration creates one separate, single device named "Spotify". It carries three independent lists:
- Playlists: your playlists (owned, followed, private and collaborative), listed alphabetically (
Playlist — <name>). - Recent tracks: your recently played tracks, most recent first (
Récent — <artist> — <track>). - Favorites: your liked/saved tracks, in the same format (
Favori — <artist> — <track>).
Picking an option in one of these lists does not play anything. It is only remembered as a pending selection, and the other two lists are automatically reset to "not selected" — the three are mutually exclusive, only one active selection at a time. It is the play button of a Spotify Connect device that acts on it: if a pending selection exists, it launches that instead of a plain resume, on that device. This works for any of your Spotify Connect devices (Mac, phone, speaker…), with no scene required.
Since each option's value is a plain Spotify URI with no extra wrapping (e.g. spotify:playlist:..., spotify:track:...), it also stays available as-is in the list's own state, so it can be read and forwarded by a scene to another integration (e.g. a local Sonos "Play URI" feature). If the selected item is later deleted or becomes inaccessible, the playback attempt fails with a clear error instead of playing something else.
All three lists are refreshed automatically after connecting, after a reauthorization, when scanning for devices, on integration startup, and every 20 minutes in the background — never on every dashboard view or scene run. Use the "Refresh Spotify content" action in the configuration screen to refresh them on demand; it reports how many playlists, recent tracks and favorites it found.
Podcasts are not returned by Spotify's "recently played" endpoint, and local files cannot be relaunched by this integration, so neither appears in these lists.
Missing permissions after an update
The playlists / recent tracks / favorites lists need permissions that an older connection may not have granted yet — favorites in particular, added later and requiring an additional permission (user-library-read). If Gladys reports missing permissions, or a list stays empty on an existing connection, click "Connect with Spotify" again in the configuration screen: Spotify shows the authorization screen again with the newly requested permissions (already-granted ones are approved in one click), without touching your existing devices, scenes, or the transport controls you already use.
Dashboard widgets
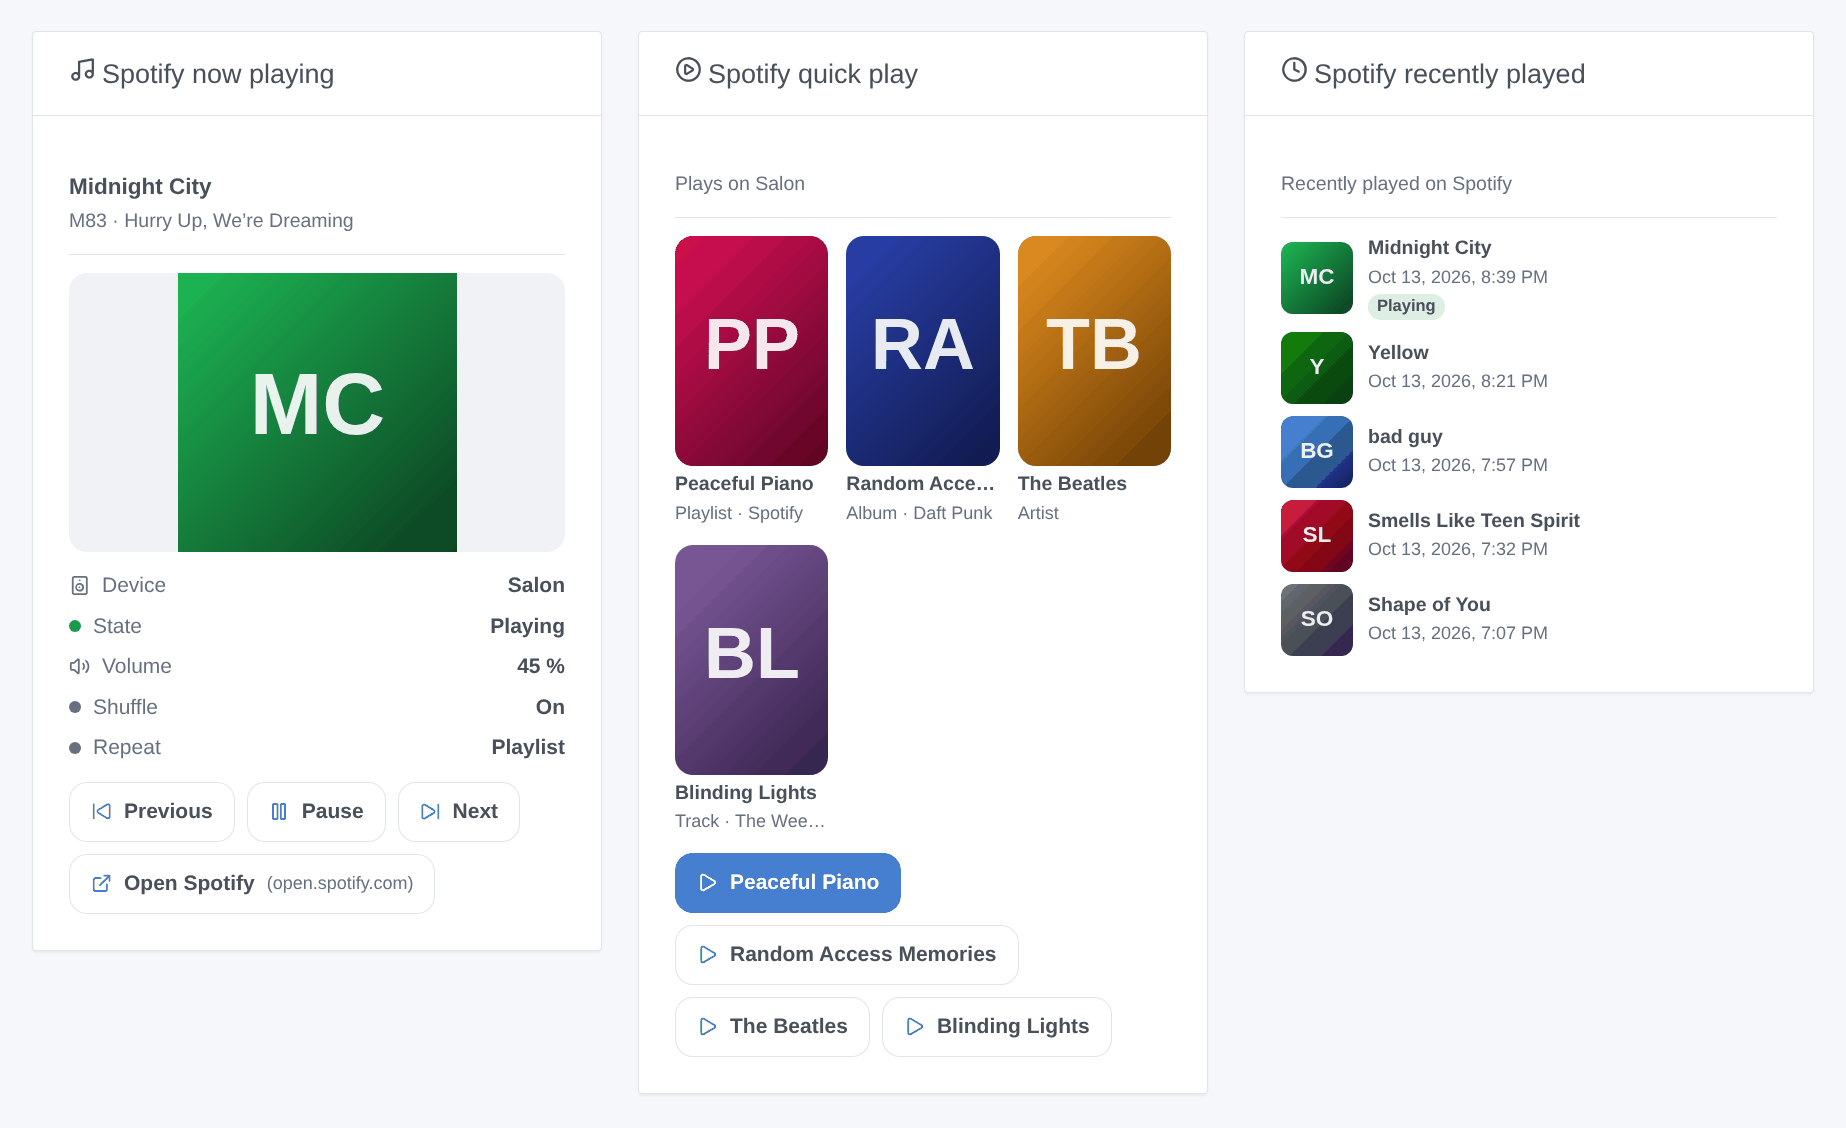
The integration provides three widgets, added from the dashboard editor ("Integrations" box). They follow Gladys' light/dark theme and language automatically.
- Spotify now playing: what your account is playing right now, on any device — cover, title, artist and album (or podcast), device, volume, shuffle and repeat — with Previous, Play/Pause, Next and Open Spotify buttons. The widget updates by itself on every change (track, pause, volume, device switch). Optional setting: a Spotify Connect device, offered to resume playback when nothing is playing (only while it is online).
- Spotify quick play: up to 4 playlists, albums, artists or tracks, shown with their cover, each with its own Play button. In the widget settings, paste a Spotify link for each slot (in Spotify: Share › Copy link, e.g.
https://open.spotify.com/playlist/...) or a URI (spotify:album:...). Also pick the device to play on; left empty, the device active at that moment is used. - Spotify recently played: the latest tracks played on your account (1 to 8, 5 by default), with cover, time played and a link to Spotify; the track playing now is badged.
The widget buttons act directly on the device shown: they do not use the pending selection of the "Spotify" device. As for the rest of the integration, a Premium account is required for playback commands.
ℹ️ Some Spotify editorial playlists ("Today's Top Hits", Daily Mix…) are no longer readable by third-party apps: their name and cover may then be missing from quick play (the widget shows "Playlist 1"…), and Spotify may refuse to play them.
Scenes
Requires Gladys 5.1.0 or later, like the widgets.
Triggers
Checked on every playback read (every 15 seconds), one event per change. Each trigger can be limited to one Spotify Connect device (leave empty for any device).
| Trigger | When | Variables |
|---|---|---|
| Spotify: playback started | A device starts playing (or playback moves to it) | device, title, artists, album, Spotify URI |
| Spotify: playback stopped | A device that was playing is paused, stopped, or playback moves to another device | same, about what stopped |
| Spotify: track changed | A device keeps playing, but another track or episode | same, about the new track |
Example: when playback starts on "Salon", dim the living room lights. Nothing fires at integration startup, and the changes caused by this integration's own scene actions never fire these triggers, so a scene cannot loop through Spotify. A change shorter than 15 seconds may go unnoticed.
Actions
| Action | Parameters | Results for the next actions |
|---|---|---|
| Spotify: play | Spotify link or URI (playlist, album, artist or track, scene variables allowed), device (empty: the active one) | device, Spotify URI |
| Spotify: pause | Device (empty: whatever is playing) | device, was playing |
| Spotify: what is playing | — | playing, device, title, artists, album, Spotify URI, volume (0 to 100) |
Example: at 7:00 on weekdays, play the "Morning" playlist on the kitchen speaker, or when I leave home, pause Spotify. Pausing a device that is not playing does nothing and succeeds. The chosen device must be online (Spotify open on it).
Troubleshooting
- Spotify shows "redirect_uri: Not matching configuration" (or does not show the authorization screen): the address declared in your Spotify application does not exactly match the one Gladys uses. Check that the Redirect URIs field contains
https://my.gladysassistant.com/redirect/oauth, with no trailing slash, and that you clicked Add then Save. If you enabled the "instance address" option, that is the address to declare instead. - "Connection refused" or "site can't be reached" when returning from Spotify: the automatic return did not complete. Copy the address of the error page and use the "Finish the connection" action (see "If the automatic return fails").
- "Spotify OAuth state mismatch": the address you pasted comes from an earlier authorization request. Keep only one authorization tab open at a time (each click generates a new request, only the last one is valid), then start over.
- "This URL carries no authorization code": you most likely copied the address after reloading the error page, which dropped the query parameters. Click "Connect with Spotify" again and copy the address without reloading the page.
- The code expired (
invalid_granterror when finishing the connection): the code is valid for a few minutes and single-use. Click "Connect with Spotify" again. - "Spotify revoked the access of Gladys": the authorization is no longer valid (authorization past its 6-month lifetime, access removed from your Spotify account, app deleted, Client Secret regenerated…). The integration then stops calling Spotify; click "Connect with Spotify" again.
Limitations
- A Premium account is mandatory for any playback command. Without it, Spotify returns a
PREMIUM_REQUIREDerror. - Only devices online at discovery time are listed.
- Up to 200 playlists, the last 50 recently played tracks and 200 favorites (Spotify's own limits, or limits set by the integration) are listed; beyond that, the extra ones are dropped (alphabetically for playlists) and logged, never silently.
- Podcasts and locally stored files never appear in the "Spotify" device's lists.
- The pending selection lives in memory only. If the integration restarts between picking an option and pressing Play, the select still shows the choice on the dashboard, but Play does a plain resume instead of launching it — pick it again if that happens.
Configuration settings
These are the settings Spotify asks for in its configuration screen in Gladys.
| Setting | Type | Required | Description |
|---|---|---|---|
| Connect your Spotify account | section | No | This integration controls your Spotify Connect devices through the Spotify Web API. A Spotify Premium account is required to control playback. First create a free Spotify application, declare the redirect URI shown below in it, paste its Client ID and Client Secret here, then click "Connect with Spotify". |
| Client ID | string | Yes | |
| Client Secret | secret | Yes | |
| Connect with Spotify | oauth2 | No | Once the Client ID and Client Secret are saved, click Connect to authorize Gladys on your Spotify account. If Gladys later reports missing permissions after an update, click it again: your devices and Gladys scenes are kept. |
| Browser could not return to Gladys? | section | No | The return from Spotify is normally automatic. If your browser lands on a blank or error page instead of coming back to Gladys, the authorization did still succeed: copy the full address from your browser address bar, paste it below, save, then click "Finish the connection". |
| Returned address | string | No |
How to install Spotify in Gladys
- In Gladys, open Integrations: Spotify appears in the catalog, next to the native integrations, with a community badge.
- Click Install. Gladys pulls the Docker image (
ghcr.io/william-de71/gladys-spotify:1.5.1), starts it in a sandbox isolated from the core, and generates the integration's interface (devices, discovery and configuration). - Open the Configuration screen of the integration, fill in the settings, and save.
- You can also install it directly from its repository URL: https://github.com/William-De71/gladys-spotify.
Spotify requires Gladys >=5.1.0. The catalog inside Gladys refreshes every hour, so a new version becomes available at most one hour after its release.
Not running Gladys yet? It is free and open source: follow the installation guide to get started.
About external integrations
Spotify is an external integration: a community integration packaged as a Docker container and published on GitHub, that Gladys installs in one click and runs in a sandbox isolated from its core. It is published and maintained by William-De71, not by the Gladys core team.
- Browse all integrations, native and community
- Build and publish your own external integration
- Source code on GitHub — source of this documentation