ESPHome smart home integration, free and open source
Control your ESPHome devices (ESP32/ESP8266) locally, over the native API.
Published by William-De71
- Devices
- Version 1.2.0
- Requires Gladys >=5.1.0
- ★ 0
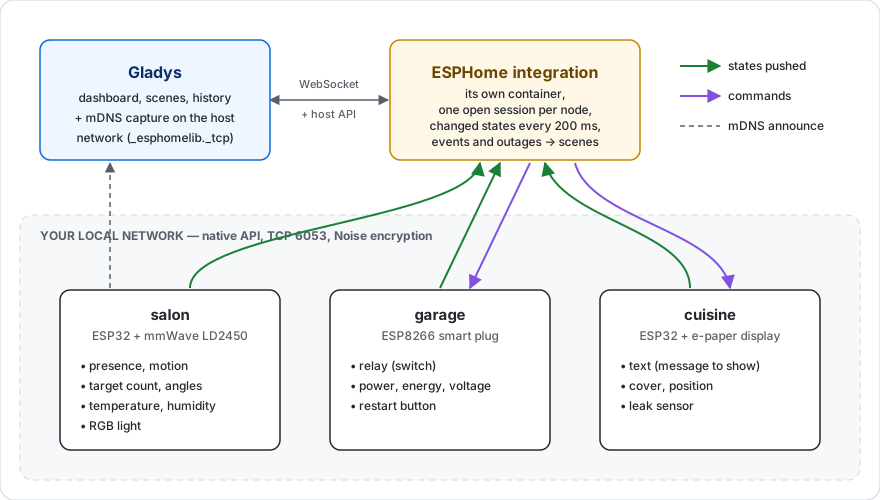
This integration controls your ESPHome devices (ESP32, ESP8266) from Gladys Assistant, directly on your local network, through the ESPHome native API. No cloud, no MQTT broker, no Home Assistant required.
What it does
Unlike an off-the-shelf device, an ESPHome node exposes exactly what you declared in its YAML file. The integration therefore adapts to whatever each node announces:
| ESPHome component | What you get in Gladys |
|---|---|
sensor | Numeric sensor (temperature, humidity, power, battery…) |
binary_sensor | Binary sensor (motion, opening, presence, leak, smoke…) |
text_sensor | Text sensor (read-only) |
text | Writable text: send a message to a node (display) |
switch | Switch (on/off) |
light | Light: on/off, brightness, color, color temperature |
cover | Cover or curtain: open, close, stop, position |
fan | Fan: on/off and speed |
lock | Lock: lock / unlock |
siren | Siren: on / off |
valve | Valve: open / closed |
button | Push button |
number | Writable numeric setting (slider) |
climate | Thermostat: setpoint (single) and measured temperature |
event | No feature: the scene trigger "ESPHome event" |
Types Gladys has no equivalent for (media_player, camera, select, date…) are simply left out of discovery. An energy sensor (in kWh or Wh) is a cumulative index: Gladys computes the consumption and its cost from it.
States arrive in real time
ESPHome pushes its state changes: the integration keeps a connection open to every node, and Gladys receives the new value the moment it changes. There is no polling interval to tune. A device you add receives right away the values its node already reported, and a reading that does not change is not sent again (it is refreshed once an hour).
Requirements
-
Gladys 5.1.0 or newer.
-
One or more devices running ESPHome 2025.10 or newer.
-
The native API enabled in your YAML (it is by default):
api:encryption:key: 'your_base64_key' -
Gladys and your ESPHome nodes must be on the same local network.
Setup
1. The encryption key
Open the integration's Configuration screen and paste, into Encryption key, the key declared under api: encryption: key: in your YAML.
If all your nodes share the same key (the common case when using a shared !secret), this is the only thing to fill in.
If your nodes have no encryption at all (
api:with noencryptionblock), leave this field empty.
2. Nodes with a different key
If some nodes have their own key, fill in Keys per node, one node per line:
living_room|kBv1s2f3G4h5J6k7L8m9N0p1Q2r3S4t5U6v7W8x9Y0=
kitchen|9xQm4Zt6R8s0T2u4V6w8X0y2Z4a6B8c0D2e4F6g8H0=
The node name is the one declared in esphome: name:. These keys take precedence over the default key.
3. Discover your devices
Go to the Discover screen and run a scan. The ESPHome nodes on your network appear there with all their entities. Add the ones you want: no IP address to type.
Discovery uses mDNS (the protocol ESPHome announces itself with). Gladys performs the capture itself, because the integration runs in a container that never receives that kind of traffic.
4. If a node is not found
Some networks block mDNS (separate VLANs, Wi-Fi with client isolation, a router filtering multicast). In that case, declare the node by hand under Nodes added by hand, one address per line:
living-room.local
192.168.1.42
192.168.1.43:6054
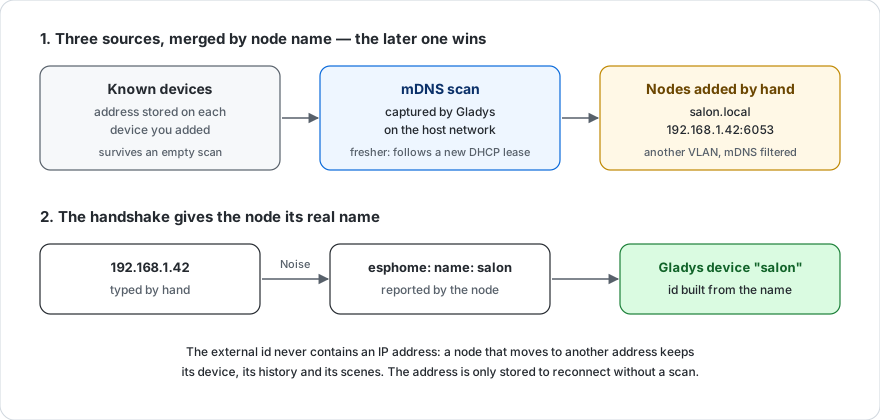
The port is optional (6053 by default). Once connected, the node reports its real name itself: a node added by IP address still shows up under its ESPHome name, and it keeps working even if its IP address changes later.
If that node has an encryption key of its own, declare it under Keys per node using the same address you typed here, not its ESPHome name:
The reason is simple: its name is only known once the connection succeeds, and the connection needs the key in the first place. This does not apply to nodes found by the scan, nor to nodes using the default key.
Available actions
- Test the connection: runs a full discovery and tells you how many nodes answered and how many features are available.
- Reconnect the nodes: closes every connection and reopens them. Useful after reflashing a node or changing a key.
Scenes
Triggers
- ESPHome event: an
evententity of a node fired — a button clicked once, twice or held, a doorbell, a remote code received. Filters: the node (esphome: name:), the entity (itsname:) and the event type (one of itsevent_types); leave a filter empty to accept everything. Variables:node,entity,entity_id,event_type. - ESPHome node offline: a node stayed disconnected for one minute. A reboot or an OTA update that is over within the minute fires nothing. Variables:
node,address. - ESPHome node back online: a node reported offline is connected again. Variables:
node,address,offline_minutes.
An event entity, fired by a button that tells single and double clicks apart:
event:
  - platform: template
    name: 'Button'
    id: button_event
    event_types: [single, double]

binary_sensor:
  - platform: gpio
    pin: GPIO0
    on_multi_click:
      - timing:
          [ON for at most 0.5s, OFF for at most 0.3s, ON for at most 0.5s, OFF for at least 0.2s]
        then:
          - event.trigger: { id: button_event, event_type: double }
      - timing: [ON for at most 0.5s, OFF for at least 0.4s]
        then:
          - event.trigger: { id: button_event, event_type: single }
Action "Run an ESPHome action"
Runs an action declared under api: actions: in the YAML of a node: play a melody, show a message, start a script.
api:
  actions:
    - action: play_rtttl
      variables:
        song_str: string
      then:
        - rtttl.play:
            rtttl: !lambda 'return song_str;'
- Node: the ESPHome name of the node, or the name of its device in Gladys.
- Action:
play_rtttl. - Arguments: a JSON object with one entry per variable, for example
{"song_str": "two_short:d=4,o=5,b=100:16e6,16e6"}. Scene variables are accepted. Leave it empty for an action without variables.
A missing, unknown or mistyped argument fails the action with a clear message, as does an action name the node does not declare (the message lists the ones it does). The outputs node and action are available to the next actions of the scene. For two seconds after this action, the events of that node start no scene: an action that fires an event cannot loop on the scene that called it.
Understanding sensors: why device_class matters
Gladys needs to know what a sensor measures to display it properly (icon, unit, chart). ESPHome carries that information through device_class.
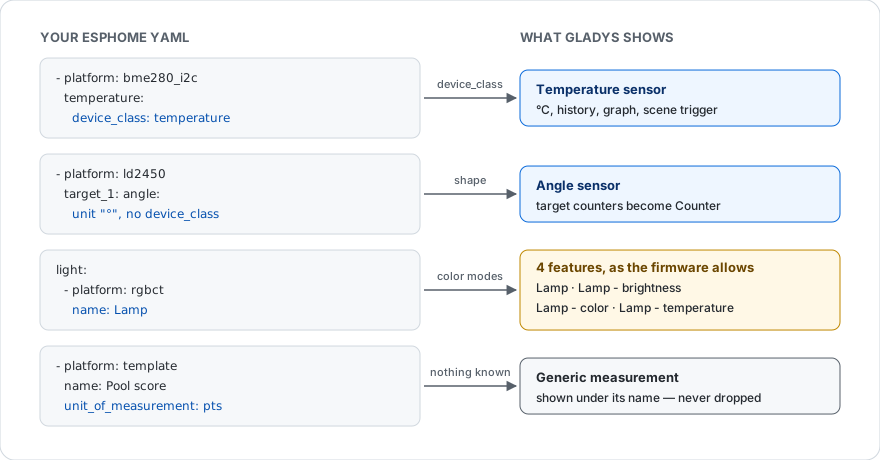
With a device_class, your sensor arrives typed:
sensor:
  - platform: dht
    temperature:
      name: 'Living room temperature'
      device_class: temperature # -> temperature sensor in Gladys
    humidity:
      name: 'Living room humidity'
      device_class: humidity # -> humidity sensor in Gladys
Without a device_class, the sensor still shows up, but under the generic "Unknown" category. It works and its history is kept, but it gets no specific icon or category. If one of your sensors appears that way, add the matching device_class to your YAML and run discovery again.
Two families of sensors escape that rule, because ESPHome never gives them a device_class — Home Assistant's vocabulary has no word for what they measure. The integration recognizes them from the shape of their declaration:
| ESPHome declaration | Gladys category |
|---|---|
unit_of_measurement: "°" | Angle |
no unit and accuracy_decimals: 0 | Counter |
This is the everyday case with mmWave sensors (ld2410, ld2450…): their target counters (Moving / Still / Presence Target Count) land under Counter, and their target angles (Target-1 Angle) under Angle. A firmware that explicitly declares state_class: measurement_angle, total or total_increasing is classified on that declaration first.
Recognized device_class values include: temperature, humidity, pressure, illuminance, battery, signal_strength, carbon_dioxide, pm25, pm10, power, energy, voltage, current, distance, moisture, speed, duration, and for binary sensors: motion, occupancy, door, window, smoke, gas, moisture, vibration, tamper, battery, lock.
Troubleshooting
No node is found by the scan Check that your nodes are powered on and connected to Wi-Fi. If your network blocks mDNS, add them by hand (see above).
A node is found but does not show up in the list This is almost always a mismatched encryption key. The node is visible on the network but refuses the connection. Check the key in its YAML, and use Keys per node if it differs from the default key.
A node disappears then comes back That is expected after a node reboot (OTA update, power cut). The integration reconnects on its own, with a growing delay so it never floods the network.
A device shows up as "unreachable" The connection to that node dropped: node powered off, out of Wi-Fi range, or rebooting. The integration retries automatically. Note also that an ESPHome node accepts a limited number of simultaneous API clients: if the same node is already connected to a Home Assistant or an open ESPHome log console, it may refuse one more connection. Close the clients you do not need and use the Reconnect the nodes action.
A thermostat only shows the measured temperature, with no setpoint
It is a two-point thermostat (heat_cool, with a low and a high setpoint). Gladys handles one setpoint per thermostat: rather than show a slider that would sit at 0 and drive nothing, the integration only publishes the measured temperature.
The action "Run an ESPHome action" fails
The node must be connected, the action name must be the one written after action: in the YAML, and the arguments must match its variables: (names and types). The error message of the scene says which one is wrong.
An entity does not show up at all
Its type has no Gladys equivalent (see the features table), or it is marked internal: true in your YAML — in which case ESPHome does not expose it on its API at all.
Configuration settings
These are the settings ESPHome asks for in its configuration screen in Gladys.
| Setting | Type | Required | Description |
|---|---|---|---|
| Getting started | section | No | This integration talks to your ESPHome nodes on your local network, through their native API (port 6053). Paste your encryption key below, then go to the Discover screen and run a scan: the nodes found on your network appear there with all their entities, ready to be added. No IP address to type. |
| Encryption key | secret | No | The base64 key declared under api: encryption: key: in your ESPHome YAML. Used for every node that has no specific key below. Leave empty only if your nodes have no encryption. |
| Nodes with a different key | section | No | Fill the two fields below only if some nodes do not share the key above, or if a node is not found by the network scan (another VLAN, mDNS filtered by your router). |
| Keys per node | secret | No | One node per line, in the form node|key. The node name is the one from your ESPHome YAML (esphome: name:), or its address. These keys take precedence over the key above. |
| Nodes added by hand | string | No | One address per line (salon.local, 192.168.1.42, or 192.168.1.42:6053), for the nodes the network scan does not find. Nodes found by the scan need nothing here. |
| Discovery duration (s) | number | No | How long the mDNS scan listens for ESPHome nodes on the network. |
| Connection timeout (s) | number | No | How long to wait for a node to answer before giving up on it. |
How to install ESPHome in Gladys
- In Gladys, open Integrations: ESPHome appears in the catalog, next to the native integrations, with a community badge.
- Click Install. Gladys pulls the Docker image (
ghcr.io/william-de71/gladys-esphome:1.2.0), starts it in a sandbox isolated from the core, and generates the integration's interface (devices, discovery and configuration). - Open the Configuration screen of the integration, fill in the settings, and save.
- You can also install it directly from its repository URL: https://github.com/William-De71/gladys-esphome.
ESPHome requires Gladys >=5.1.0. The catalog inside Gladys refreshes every hour, so a new version becomes available at most one hour after its release.
Not running Gladys yet? It is free and open source: follow the installation guide to get started.
About external integrations
ESPHome is an external integration: a community integration packaged as a Docker container and published on GitHub, that Gladys installs in one click and runs in a sandbox isolated from its core. It is published and maintained by William-De71, not by the Gladys core team.
- Browse all external integrations
- Discover the native integrations built into Gladys
- Build and publish your own external integration
- Source code on GitHub — source of this documentation